The shag cut has made one of the most powerful comebacks in modern hairstyling — and it’s not just for wavy or curly textures anymore. Straight hair, often considered “flat” or “hard to layer,” is actually one of the most stunning canvases for a perfectly executed shag cut. When designed correctly, a shag haircut on straight hair creates movement, volume, dimension, and that coveted effortless cool-girl energy that dominates Pinterest boards everywhere.
What makes the shag cut so popular right now is its versatility. It can be soft and feminine, edgy and bold, minimal and professional, or dramatic and fashion-forward. The defining features typically include layered lengths, feathered ends, face-framing pieces, and optional curtain or wispy bangs. However, for straight hair specifically, precision becomes key. Since straight hair naturally shows every cut line and layer, the technique must enhance movement without looking choppy or disconnected.
This guide explores ten highly detailed shag cut ideas designed especially for straight hair types — whether fine, medium, or thick. Each idea includes a clear explanation of the look, who it works best for, how to style it, and exactly what tools and products you need to achieve it. These ideas are practical, beginner-friendly, and perfect for saving to your Pinterest hair inspiration board.
If you’re looking to transform straight hair into something modern, textured, and effortlessly stylish, these shag cut variations will help you find your perfect match. Whether you prefer short, mid-length, or long styles — soft layers or dramatic texture — there’s a straight shag haircut here designed to elevate your look.
Let’s dive into the ideas.
1. Classic Shoulder-Length Shag with Soft Curtain Bangs
The classic shoulder-length shag is the perfect introduction to layered texture without going too extreme. This version features soft, blended layers that begin around the cheekbones and gradually taper down toward the shoulders. The curtain bangs gently part in the middle and frame the face, giving straight hair instant movement and structure.
For straight hair, this cut adds the illusion of fullness while maintaining a lightweight finish. The key is subtle feathering at the ends to prevent blunt heaviness. This style works beautifully for fine to medium hair textures and flatters oval, heart, and long face shapes.
What Defines This Look
- Shoulder-length base
- Soft, blended layers
- Light feathered ends
- Curtain bangs that blend into layers
Step-by-Step Styling Guide
- Start with towel-dried hair and apply a lightweight volumizing mousse at the roots.
- Blow-dry using a round brush, lifting at the crown for subtle volume.
- Use a flat iron to lightly bend the ends outward for soft movement.
- Add a texturizing spray through mid-lengths.
- Finish with flexible-hold hairspray.
Materials & Products Needed
- Volumizing mousse
- Medium round brush
- Blow dryer with concentrator nozzle
- Flat iron
- Texturizing spray
- Light hairspray
This is one of the most save-worthy Pinterest styles because it’s wearable, timeless, and low-maintenance.

2. Long Straight Shag with Face-Framing Layers
If you love length but want dimension, the long straight shag is your answer. This version keeps the length below the chest while incorporating multiple layers starting at the chin. The face-framing pieces soften the jawline and add natural contouring.
Straight hair benefits from internal layering here, which prevents the cut from appearing flat. The layers should be slightly graduated, not overly choppy, to maintain elegance.
What Defines This Look
- Long base length
- Chin-starting face-framing layers
- Light internal layering
- Soft textured ends
Step-by-Step Styling Guide
- Apply heat protectant spray.
- Blow-dry straight using a paddle brush.
- Use a straightener to create subtle flicks at the ends.
- Lightly tease the crown for lift.
- Apply smoothing serum only to ends.
Materials & Products Needed
- Heat protectant
- Paddle brush
- Blow dryer
- Flat iron
- Teasing comb
- Lightweight serum
This style is ideal for those wanting movement without sacrificing length.

3. Short Shag Bob for Straight Hair
The short shag bob combines structure with softness. Cut above the shoulders, this look incorporates short crown layers and wispy ends to prevent bulk.
This is perfect for fine straight hair that needs lift and body. The shorter layers at the top create natural volume.
What Defines This Look
- Chin to collarbone length
- Crown-focused layering
- Wispy textured ends
- Optional micro or soft bangs
Step-by-Step Styling Guide
- Apply volumizing root spray.
- Blow-dry upside down for lift.
- Use a flat iron for subtle bends.
- Add matte texture spray.
- Finger-style for separation.
Materials & Products Needed
- Root lift spray
- Blow dryer
- Flat iron
- Matte texture spray
- Finishing spray
This is a bold yet wearable Pinterest favorite.

4. Wispy Bangs Shag for Fine Straight Hair
Fine straight hair benefits greatly from airy layering and soft fringe. This shag includes ultra-light layers and wispy bangs that barely graze the brows.
The goal is weight removal without thinning the hair too much.
What Defines This Look
- Lightweight layering
- Delicate feathered ends
- Thin wispy bangs
- Soft natural movement
Step-by-Step Styling Guide
- Apply thickening spray.
- Blow-dry with round brush.
- Add subtle bends with straightener.
- Mist texturizing spray.
- Finish with shine mist.
Materials & Products Needed
- Thickening spray
- Round brush
- Blow dryer
- Flat iron
- Texturizing spray
- Shine mist
Perfect for minimalists who want softness.

5. Edgy Choppy Shag with Blunt Bangs
This bold variation features pronounced layers and blunt bangs. It’s ideal for medium to thick straight hair.
The key is visible layering with sharp ends.
What Defines This Look
- Heavy layering
- Blunt full bangs
- Razor-textured ends
- Slightly disconnected finish
Step-by-Step Styling Guide
- Apply heat protectant.
- Blow-dry flat.
- Use flat iron for sleek finish.
- Add dry texture spray.
- Separate layers with fingers.
Materials & Products Needed
- Heat protectant
- Blow dryer
- Flat iron
- Dry texture spray
- Light wax
A strong, edgy statement style.
6. Mid-Length Layered Shag with Middle Part
This balanced look suits nearly everyone. The layers fall naturally around the collarbone.
What Defines This Look
- Collarbone length
- Balanced layering
- Middle part
- Soft textured finish
Step-by-Step Styling Guide
- Apply smoothing cream.
- Blow-dry straight.
- Slightly curve ends inward.
- Add volume spray at roots.
- Finish with flexible spray.
Materials & Products Needed
- Smoothing cream
- Blow dryer
- Flat iron
- Root spray
- Hairspray
Professional and polished.

7. Textured Shag with Tapered Ends
This version focuses on tapered ends to create feather-like softness.
What Defines This Look
- Multi-length layers
- Tapered ends
- Natural flow
- Subtle crown volume
Step-by-Step Styling Guide
- Use mousse at roots.
- Blow-dry lifting sections.
- Add soft flicks with straightener.
- Apply lightweight oil to ends.
- Finish with texture spray.
Materials Needed
- Mousse
- Blow dryer
- Straightener
- Hair oil
- Texture spray

8. Minimalist Shag for Thick Straight Hair
Thick straight hair needs debulking. This shag uses internal layering to remove heaviness.
What Defines This Look
- Long layers
- Weight removal
- Clean ends
- Subtle movement
Step-by-Step Styling Guide
- Apply smoothing serum.
- Blow-dry in sections.
- Flat iron for polish.
- Use light texturizer.
- Finish sleek.
Materials Needed
- Serum
- Blow dryer
- Straightener
- Texturizing spray

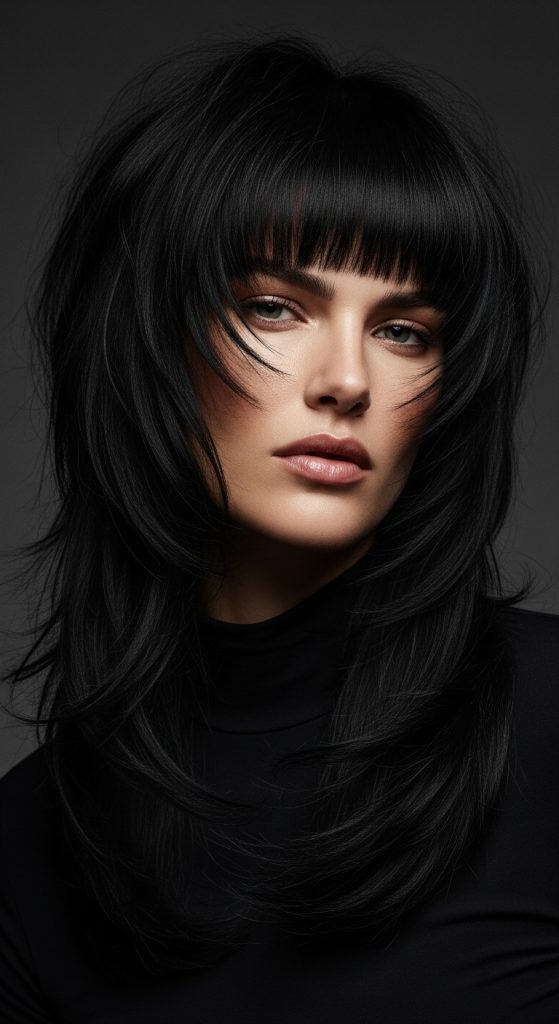
9. Shag with Micro Bangs
A fashion-forward look with short bangs.
What Defines This Look
- Short fringe
- Structured layering
- Sleek finish
- High-fashion edge
Step-by-Step Styling Guide
- Apply heat protectant.
- Blow-dry bangs forward.
- Straighten rest of hair.
- Add matte texture spray.
- Light hairspray finish.
Materials Needed
- Heat protectant
- Blow dryer
- Flat iron
- Texture spray

10. Soft Romantic Long Shag
This feminine variation features long cascading layers.
What Defines This Look
- Long base
- Gentle layering
- Soft face framing
- Lightweight ends
Step-by-Step Styling Guide
- Apply volumizing mousse.
- Blow-dry with round brush.
- Add soft bends.
- Apply shine serum.
- Finish lightly.
Materials Needed
- Mousse
- Round brush
- Blow dryer
- Straightener
- Shine serum
