Sometimes boredom strikes, and you need something fun and creative to pass the time. DIY crafts are not only enjoyable but also a productive way to express yourself, learn new skills, and even decorate your space. Whether you are a beginner or an experienced crafter, there’s something here for everyone. In this guide, we’ll explore ten fun DIY crafts you can try when you’re bored. Each craft includes step-by-step instructions, tips, and variations to make it uniquely yours.
1. Painted Rock Art
Painting rocks is a relaxing and creative activity that can be enjoyed by all ages. The possibilities are endless—you can create cute characters, inspirational messages, or abstract patterns.
Materials Needed:
- Smooth rocks
- Acrylic paints
- Paintbrushes
- Sealant spray
Steps:
- Wash and dry your rocks to remove dirt.
- Sketch a design lightly with a pencil if you want guidance.
- Use acrylic paints to bring your design to life.
- Let the paint dry completely.
- Apply a sealant spray to protect your artwork.
Tips:
- Try making a set of rocks with inspirational words and hide them around your neighborhood for a fun scavenger hunt.
- Use fine brushes for detailed patterns or dotting tools for mandala designs.

2. Homemade Candles
Making candles is a satisfying craft that also leaves you with a useful item for your home. You can customize the scents, colors, and shapes.
Materials Needed:
- Candle wax
- Candle wicks
- Jars or molds
- Essential oils
- Dye (optional)
Steps:
- Melt the wax using a double boiler.
- Add essential oils and dye for scent and color.
- Place the wick in the center of your jar or mold.
- Pour the wax carefully and let it cool completely.
- Trim the wick and your candle is ready.
Tips:
- Experiment with layered colors for a visually striking effect.
- Use small jars to make personalized gifts for friends or family.

3. DIY Friendship Bracelets
Friendship bracelets are classic, fun, and perfect for passing time creatively. They also make meaningful gifts.
Materials Needed:
- Embroidery floss or yarn
- Scissors
- Tape or a clipboard
Steps:
- Cut several strands of floss about 30 inches each.
- Tie a knot at one end and secure it with tape or a clipboard.
- Choose a pattern like stripes, chevrons, or braids.
- Knot the strands according to your chosen pattern until the bracelet reaches the desired length.
- Tie a knot at the end and trim excess threads.
Tips:
- Use different colors to create unique patterns.
- Learn advanced knotting techniques to make intricate designs.

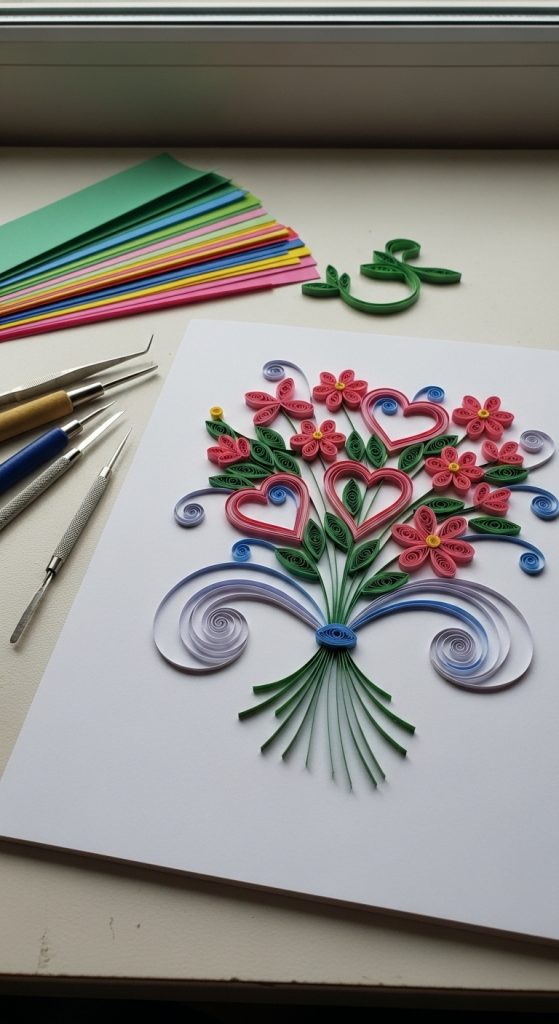
4. Paper Quilling
Paper quilling is an elegant craft that involves rolling and shaping thin strips of paper into decorative designs.
Materials Needed:
- Quilling paper strips
- Quilling tool or toothpick
- Glue
- Cardstock or frame
Steps:
- Roll the paper strips tightly around the quilling tool.
- Shape the coils into circles, teardrops, or other designs.
- Glue the shapes onto a piece of cardstock to form patterns.
- Let it dry and frame your artwork.
Tips:
- Combine different shapes and colors for a stunning effect.
- Try making greeting cards with quilled designs for personal gifts.
5. DIY Photo Frames
Personalizing photo frames is an easy way to display your favorite memories and create a homey vibe.
Materials Needed:
- Plain wooden or cardboard frames
- Paint or markers
- Decorative items like buttons, shells, or beads
- Glue
Steps:
- Paint the frame in your favorite color.
- Once dry, decorate with beads, buttons, or other embellishments.
- Insert your favorite photo.
Tips:
- Use seasonal decorations like leaves or snowflakes for holiday-themed frames.
- Experiment with decoupage using printed paper or magazine cutouts.

6. Tie-Dye Clothing
Tie-dyeing clothes is a fun way to breathe new life into plain T-shirts, socks, or even pillowcases.
Materials Needed:
- White or light-colored clothing
- Fabric dye
- Rubber bands
- Gloves and plastic covering
Steps:
- Twist and secure the fabric with rubber bands in your preferred pattern.
- Apply dye carefully to each section.
- Let the dye sit according to the instructions.
- Rinse thoroughly and let the clothing dry.
Tips:
- Experiment with ombre or spiral patterns.
- Use multiple colors for a vibrant effect.

7. Origami Creations
Origami, the Japanese art of paper folding, is a calming craft that sharpens your concentration and creativity.
Materials Needed:
- Square sheets of paper
- Instruction guide or templates
Steps:
- Follow folding instructions carefully.
- Crease each fold sharply for a clean finish.
- Transform the paper into animals, flowers, or geometric designs.
Tips:
- Use patterned or colored paper for a unique look.
- Create a garland by stringing together multiple origami pieces.

8. DIY Planters
Transform empty jars, cans, or bottles into charming planters to brighten up your space.
Materials Needed:
- Empty containers
- Paint
- Soil
- Small plants or succulents
Steps:
- Clean and paint your container.
- Fill it with soil.
- Plant your chosen greenery.
- Place it on a windowsill or desk.
Tips:
- Add decorative stones or moss on top of the soil for a polished look.
- Customize with chalkboard paint to label your plants.

9. Handmade Soap
Creating your own soap is fun, relaxing, and leaves you with useful gifts. You can experiment with scents, colors, and shapes.
Materials Needed:
- Melt-and-pour soap base
- Soap molds
- Essential oils
- Colorants (optional)
Steps:
- Melt the soap base according to instructions.
- Add essential oils and colors.
- Pour into molds and let it set.
- Remove from molds and your soap is ready to use.
Tips:
- Layer different colors for a visually interesting effect.
- Add herbs or exfoliants like oatmeal or dried flowers.

10. Decorative Mason Jars
Mason jars are versatile and can be transformed into decorative storage containers, candle holders, or vases.
Materials Needed:
- Mason jars
- Paint, twine, or fabric
- Glue
- Optional lights or flowers
Steps:
- Paint or decorate the jar as desired.
- Wrap with twine or fabric for added texture.
- Fill with flowers, candles, or fairy lights.
Tips:
- Use jars to organize small craft supplies or stationery.
- Create themed jars for holidays or events.

Final Tips for DIY Fun
- Start Small: Begin with simple projects to avoid frustration.
- Mix Materials: Combine different craft supplies to create unique items.
- Document Your Work: Take photos of your creations to track progress or share on Pinterest.
- Repurpose Items: Look around your home for materials that can be reused.
- Have Fun: The goal is to enjoy yourself, not to create perfection.
Crafting is a wonderful way to relax, express creativity, and make something beautiful out of simple materials. These ten DIY ideas are perfect to tackle boredom while creating memorable and useful items. Try them all, customize them to your style, and let your imagination run wild.