10 Hair Braid Patterns Ideas
Hair braid patterns are the foundation of every stunning braided hairstyle. While many people focus on braid size, length, or color, the real magic often lies in the pattern itself. The way hair is parted, sectioned, and braided across the scalp determines whether a style looks simple, bold, artistic, or completely show-stopping. A well-designed braid pattern can transform even the most basic protective style into a Pinterest-worthy masterpiece.
Braid patterns are not just about beauty — they also influence tension distribution, scalp health, longevity of the style, and versatility in styling. Whether you’re planning cornrows, box braids, stitch braids, Fulani braids, lemonade braids, or freestyle designs, the braid pattern acts as the blueprint. Clean lines, symmetry, curves, and creative shapes all contribute to the final result.
One of the biggest reasons braid patterns are trending on Pinterest is their ability to feel custom and unique. Two people can have the same braid size and length, but if the pattern differs, the entire vibe changes. From geometric grids to curved swoops, zigzag parts to heart-shaped sections, braid patterns allow endless personalization.
Another benefit of understanding braid patterns is that it helps you communicate better with your stylist. Instead of saying “I want braids,” you can specify the exact layout you’re envisioning. This makes your appointment smoother and ensures you leave the salon satisfied. For DIY braiders, knowing how to create different patterns opens up creative freedom and skill development.
In this detailed guide, you’ll discover 10 hair braid pattern ideas that are beginner-friendly yet creative enough to stand out. Each idea includes a clear explanation, step-by-step guidance, and a materials list so you can recreate the look confidently. Whether you’re preparing for a vacation, special event, school season, or simply want a fresh new look, these braid pattern ideas will inspire your next protective style.
Let’s explore these save-worthy braid pattern ideas.
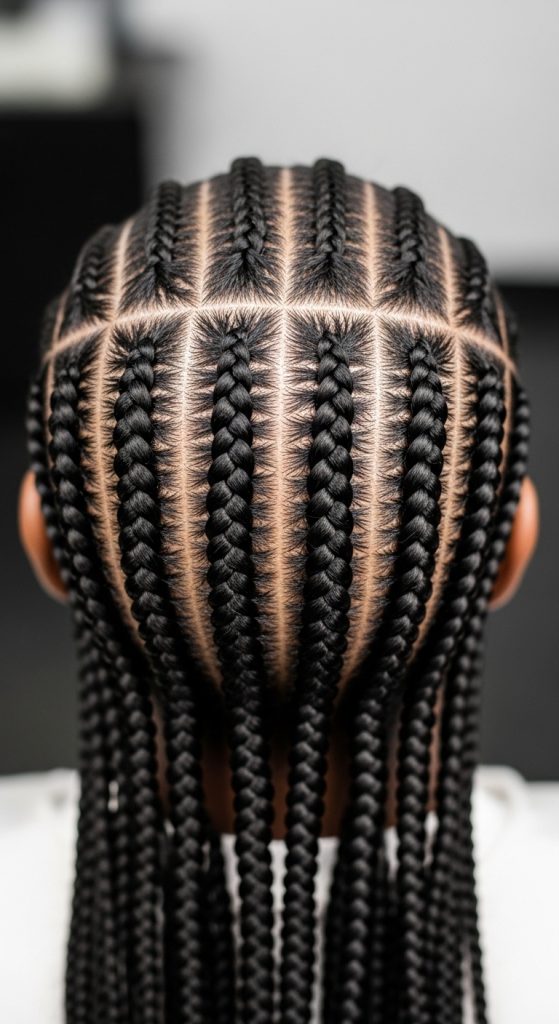
1. Classic Straight-Back Cornrow Pattern
The straight-back cornrow pattern is one of the most timeless and foundational braid layouts. In this pattern, the hair is parted into evenly spaced vertical rows that run from the hairline to the nape of the neck. Each section is braided straight back, creating a clean, symmetrical look.
This braid pattern is perfect for beginners because it emphasizes neat parting and consistent tension. It works beautifully on natural hair and can be styled alone or used as a base for wigs, sew-ins, or crochet installations.
Why This Pattern Works
Straight-back cornrows distribute tension evenly across the scalp. The uniform direction creates a sleek and polished finish that suits both casual and athletic settings.
How to Create the Straight-Back Pattern
- Start with freshly washed, detangled hair.
- Blow-dry or stretch hair for easier parting.
- Use a rat-tail comb to create a straight center part.
- Continue making evenly spaced vertical parts.
- Clip away unused sections.
- Apply braiding gel to one section at a time.
- Braid each row tightly but comfortably toward the back.
- Secure ends with small elastics if needed.
Materials Needed
- Rat-tail comb
- Sectioning clips
- Braiding gel
- Edge control
- Hair elastics
This pattern is clean, practical, and always in style.
2. Zigzag Part Braid Pattern
Zigzag braid patterns add playful movement and visual interest to traditional cornrows or box braids. Instead of straight parts, the sections are parted in sharp zigzag lines across the scalp.
This pattern is bold yet wearable and works especially well for school hairstyles, summer looks, or creative braid styles.
What Makes It Unique
The zigzag pattern adds dimension without requiring complicated braiding techniques. The interest comes from the parting itself.
Step-by-Step Guide
- Stretch hair for precise parting.
- Use a rat-tail comb to draw a zigzag line from front to back.
- Clean up edges of each zigzag section.
- Clip away remaining hair.
- Braid along the zigzag parting.
- Repeat across the head.
- Apply mousse to smooth flyaways.
Materials Needed
- Precision rat-tail comb
- Shine and jam gel
- Hair clips
- Mousse
This pattern photographs beautifully and stands out on Pinterest boards.
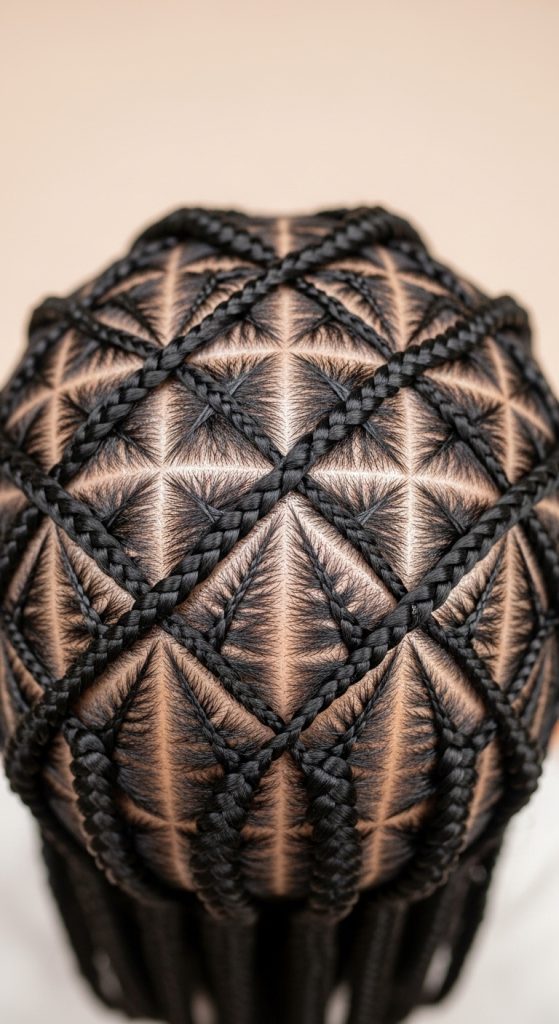
3. Diamond Grid Box Braid Pattern
The diamond grid pattern transforms standard box braids into a geometric masterpiece. Instead of square parts, the hair is sectioned into diamond shapes.
This pattern looks intricate and professional, making it ideal for long-term protective styles.
Why Choose Diamonds?
The angled sections create a more dynamic look compared to traditional squares.
How to Achieve the Diamond Pattern
- Create a center part.
- Start forming angled diagonal parts.
- Connect diagonal lines to create diamond shapes.
- Secure each section with clips.
- Install box braids within each diamond section.
- Ensure uniform braid size.
Materials Needed
- Rat-tail comb
- Sectioning clips
- Braiding hair
- Gel
This pattern elevates any box braid style instantly.
4. Heart-Shaped Braid Pattern
Heart-shaped braid patterns are artistic and personalized. A heart design is created using curved parting lines before braiding.
This style is perfect for birthdays, Valentine’s events, or anyone wanting a unique look.
Why It’s Popular
It adds personality and creativity to protective styling.
How to Create a Heart Pattern
- Map out heart shape using comb.
- Carefully define curved part lines.
- Braid along the heart outline.
- Continue with straight braids around it.
- Smooth edges with gel.
Materials Needed
- Precision comb
- Strong-hold gel
- Sectioning clips
A statement-making pattern that feels custom.
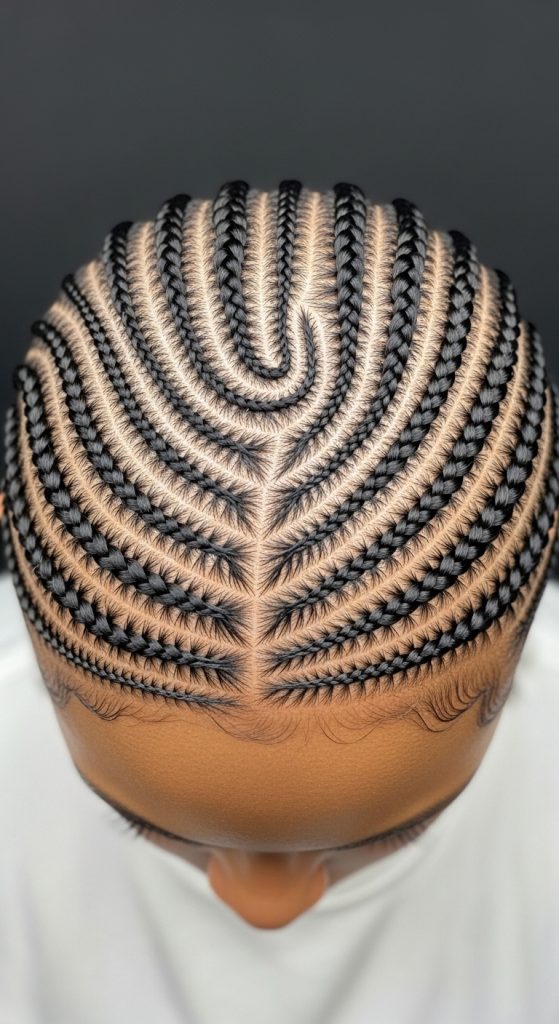
5. Side-Swept Lemonade Pattern
Inspired by side-swept cornrows, this pattern braids hair diagonally toward one side of the head.
It creates a dramatic asymmetrical look.
Benefits
- Frames face beautifully
- Adds volume to one side
- Modern and trendy
How-To
- Create deep side part.
- Section hair diagonally.
- Braid each row toward one side.
- Maintain consistent spacing.
Materials
- Rat-tail comb
- Braiding gel
- Edge control
This pattern is flattering and fashion-forward.
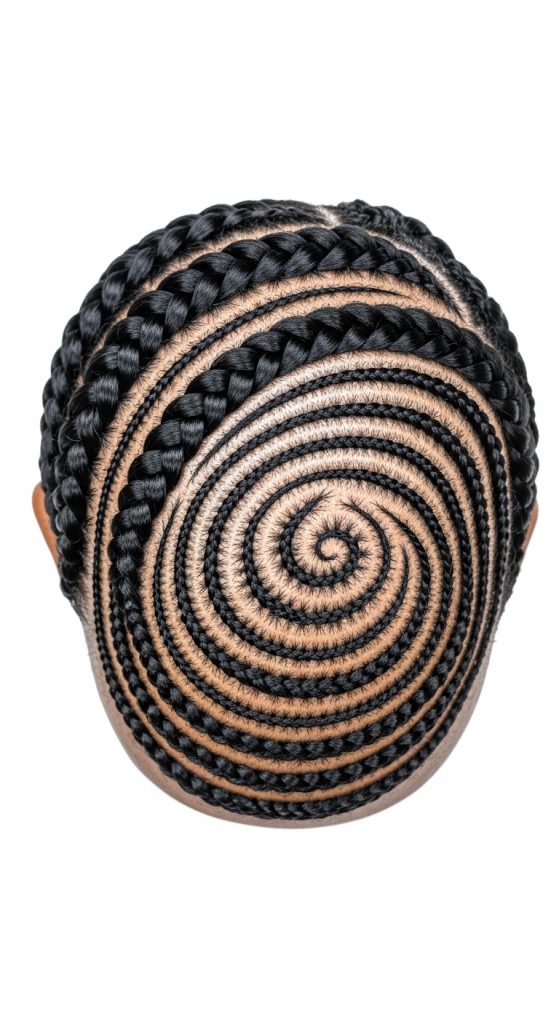
6. Circular Halo Braid Pattern
The circular braid pattern spirals around the head like a halo.
It works beautifully for updos and goddess-style braids.
Why It Stands Out
The spiral design creates soft, flowing movement.
Steps
- Start parting at crown.
- Create circular sections outward.
- Braid following the circular path.
- Continue spiral until complete.
Materials
- Comb
- Gel
- Clips
This pattern feels regal and elegant.

7. Crisscross Braid Pattern
Crisscross braid patterns layer small cornrows over larger ones in intersecting directions.
It creates dimension and layered texture.
Unique Features
- Adds complexity
- Great for kids and teens
- Eye-catching
How-To
- Section hair horizontally.
- Create diagonal parts crossing over.
- Braid small sections over larger ones.
- Secure tightly.
Materials
- Rat-tail comb
- Gel
- Rubber bands
This pattern is playful and dynamic.
8. Triangle Part Braid Pattern
Triangle parts are a trendy alternative to square or diamond sections.
The angular layout gives a sharp, edgy finish.
Why Choose Triangles?
They provide a modern twist to classic box braids.
Steps
- Create horizontal base section.
- Form triangular shapes.
- Secure each section.
- Install braids evenly.
Materials
- Precision comb
- Braiding hair
- Gel
Clean, bold, and Pinterest-perfect.
9. Freestyle Artistic Pattern
Freestyle braid patterns combine curves, shapes, and varying braid sizes.
No strict symmetry — just creativity.
Why It’s Trending
It allows individuality and creative expression.
How-To
- Visualize overall design.
- Mix curved and straight parts.
- Vary braid thickness.
- Ensure balanced layout.
Materials
- Comb
- Strong hold gel
- Braiding hair
Perfect for bold personalities.
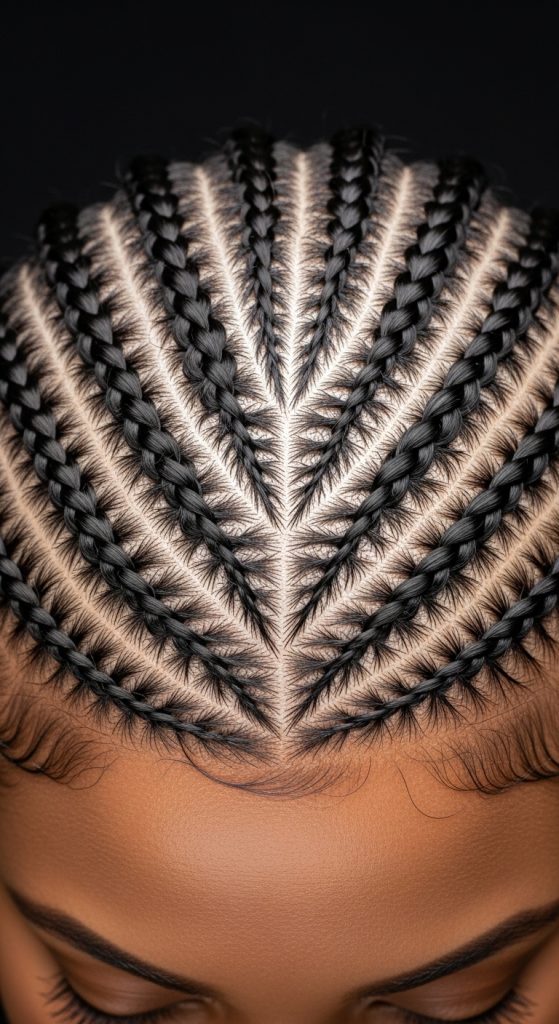
10. Center-Part with Curved Side Braids Pattern
This pattern blends symmetry and softness. A straight center part anchors the design, while curved braids flow outward on both sides.
It balances structure with movement.
Benefits
- Flattering for most face shapes
- Elegant yet modern
- Versatile for styling
How-To
- Create straight center part.
- Section curved parts on sides.
- Braid following curve direction.
- Smooth and set with mousse.
Materials
- Rat-tail comb
- Gel
- Mousse