10 Simple Nail Designs Ideas
Simple nail designs have become one of the biggest beauty trends for a reason: they are elegant, wearable, beginner-friendly, and effortlessly stylish. While intricate nail art can look stunning, it often requires professional skills, specialized tools, and hours of time. Simple nail designs, on the other hand, prove that minimal effort can still create maximum impact. With clean lines, soft colors, subtle accents, and timeless patterns, you can achieve Pinterest-worthy nails right at home.

Minimal nail art is especially popular because it fits every lifestyle. Whether you’re a student, working professional, busy parent, or someone who simply loves low-maintenance beauty, simple nail designs are practical and versatile. They work beautifully for everyday wear, office settings, special events, and even weddings. The clean aesthetic also photographs extremely well, which is why “simple nail ideas” continues to trend across Pinterest boards.
Another reason simple nail designs are so appealing is their adaptability. You can customize them based on season, mood, or outfit without overwhelming your look. Soft nudes for a polished everyday style, pastels for spring, muted tones for fall, and subtle shimmer for holidays — the options are endless. Even the smallest details, like a single dot or thin line, can elevate a plain manicure into something intentional and stylish.
This guide will walk you through 10 simple nail design ideas that are easy to recreate at home. Each idea includes a clear explanation of the look, step-by-step instructions, and a materials list to help you get started confidently. These designs are beginner-friendly, practical, and optimized for a clean Pinterest aesthetic.
If you’ve been searching for easy nail designs for beginners, minimal nail art ideas, simple manicure inspiration, or classy everyday nail looks, you’ll find exactly what you need here.
Let’s explore 10 simple nail designs you can try today.
1. Minimal White Line Design
Introduction
A minimal white line nail design is one of the most timeless and chic options for a simple manicure. Clean white lines placed strategically over a nude or soft pink base create a modern, high-end look without requiring advanced skills. This design is popular because it balances simplicity with sophistication. It looks polished enough for the office yet trendy enough for social media photos.
The beauty of white line designs lies in their versatility. You can add a single horizontal stripe, vertical lines, curved accents near the cuticle, or diagonal strokes across one accent nail. Even beginners can achieve this look with a thin nail art brush or striping tape. Because the design relies on precision rather than complexity, taking your time is the key to success.
This style works best with neutral bases, but you can experiment with muted colors like dusty rose or light beige for subtle variety.
What This Design Is
A neutral base color enhanced with thin white lines for a clean, minimalist effect.
Step-by-Step How-To
- Clean and shape your nails.
- Apply a base coat and let it dry.
- Apply two thin coats of nude or pale pink polish.
- Once fully dry, use a thin brush dipped in white polish.
- Draw your chosen line design carefully.
- Allow lines to dry completely.
- Seal with a glossy top coat.
Materials Needed
- Base coat
- Nude or pale pink nail polish
- White nail polish
- Thin nail art brush or striping tape
- Top coat

2. Nude Nails with Tiny Black Dots
Introduction
Tiny black dots on a nude base create an ultra-simple yet playful nail look. This design is ideal for beginners because it requires minimal precision and tools. The contrast between the soft nude and bold black dot makes the manicure visually interesting without being overwhelming.
You can place a single dot near the cuticle, cluster a few dots in one corner, or add one dot per nail for a consistent look. This design is subtle but eye-catching and works beautifully for everyday wear.
What This Design Is
A neutral base manicure with small black dot accents.
Step-by-Step How-To
- Prepare nails and apply base coat.
- Apply two coats of nude polish.
- Dip a dotting tool into black polish.
- Lightly press onto nail where desired.
- Repeat on each nail.
- Let dry and seal with top coat.
Materials Needed
- Nude nail polish
- Black nail polish
- Dotting tool or toothpick
- Base coat
- Top coat

3. Soft Pastel French Tips
Introduction
French tips are classic, but using pastel colors instead of white gives them a modern twist. Soft shades like lavender, baby blue, mint, or blush create a fresh seasonal vibe while maintaining elegance.
This design is perfect for spring and summer but works year-round with the right shade choice.
What This Design Is
A traditional French manicure with pastel-colored tips.
Step-by-Step How-To
- Apply base coat.
- Paint nails with sheer nude or clear polish.
- Use tape or a steady hand to paint pastel tips.
- Clean edges carefully.
- Apply top coat.
Materials Needed
- Sheer nude polish
- Pastel polish of choice
- Nail tape (optional)
- Base and top coat

4. Single Accent Glitter Nail
Introduction
If you love sparkle but prefer subtlety, a single glitter accent nail is the perfect solution. This design keeps most nails simple while adding one statement nail.
It’s easy, beginner-friendly, and works for parties or holidays.
What This Design Is
Four solid nails and one glitter-covered accent nail.
Step-by-Step How-To
- Apply base coat.
- Paint four nails with chosen color.
- Apply glitter polish on one nail.
- Let dry thoroughly.
- Add top coat.
Materials Needed
- Solid color polish
- Glitter polish
- Base and top coat

5. Thin Gold Foil Accent
Introduction
Gold foil adds luxury without complexity. Tiny foil flakes over a neutral base create a high-end minimalist look.
What This Design Is
Neutral nails with small gold foil pieces placed strategically.
Step-by-Step How-To
- Apply neutral polish.
- While slightly tacky, place foil pieces.
- Press gently.
- Seal with thick top coat.
Materials Needed
- Neutral polish
- Gold nail foil
- Tweezers
- Top coat

6. Matte Solid Color Nails
Introduction
Sometimes simplicity means no art at all — just a beautiful matte finish. Matte top coats instantly transform glossy polish into modern elegance.
What This Design Is
Single color manicure with matte finish.
Step-by-Step How-To
- Apply base coat.
- Apply two coats of chosen polish.
- Let dry.
- Apply matte top coat.
Materials Needed
- Colored polish
- Matte top coat
- Base coat

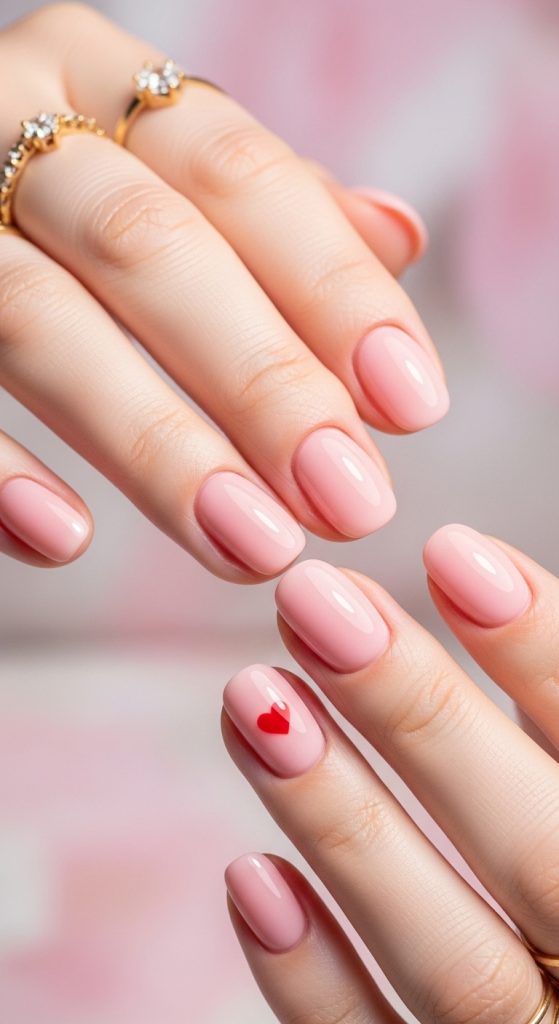
7. Minimal Heart Accent
Introduction
A tiny heart on one nail creates a cute yet subtle detail.
What This Design Is
Neutral nails with one small heart design.
Step-by-Step How-To
- Apply base color.
- Use dotting tool to create two dots.
- Drag downward to form heart.
- Let dry.
- Seal with top coat.
Materials Needed
- Base polish
- Accent color
- Dotting tool
- Top coat
8. Diagonal Color Block
Introduction
Diagonal color blocking is modern and easy to achieve with tape.
What This Design Is
Two-tone nails separated diagonally.
Step-by-Step How-To
- Apply base color.
- Let dry fully.
- Place tape diagonally.
- Paint second color.
- Remove tape.
- Apply top coat.
Materials Needed
- Two polish colors
- Nail tape
- Base and top coat

9. Clear Nails with Tiny Stars
Introduction
Clear nails with tiny star decals create a dreamy minimalist design.
What This Design Is
Sheer base with small star stickers.
Step-by-Step How-To
- Apply clear or sheer base.
- Place star decals.
- Press gently.
- Seal with top coat.
Materials Needed
- Clear polish
- Star decals
- Top coat

10. Subtle Ombre Fade
Introduction
A soft ombre fade between two similar shades creates a gentle gradient effect that looks professionally done but can be recreated at home.
What This Design Is
Two blended shades creating a smooth gradient.
Step-by-Step How-To
- Apply base shade.
- Dab second shade onto sponge.
- Lightly sponge onto tips.
- Blend gently.
- Apply top coat.
Materials Needed
- Two similar polish shades
- Makeup sponge
- Base and top coat
