10 Quick Nail Art Ideas
Quick nail art ideas are perfect for anyone who wants stylish nails without spending hours at the salon or struggling with complicated techniques. Whether you’re getting ready for work, a last-minute event, a weekend outing, or simply want to refresh your manicure fast, simple and speedy nail designs can completely transform your look in under 30 minutes.
The beauty of quick nail art lies in its simplicity. Most fast designs rely on small accents, minimal tools, and clever techniques like dotting, striping, sponging, or using stickers. You don’t need advanced artistic skills to create something eye-catching. In fact, some of the most popular Pinterest nail trends are based on tiny details — a single line, a soft gradient, or a subtle sparkle.
Another reason quick nail art is so popular is practicality. These designs are beginner-friendly, require minimal drying time, and often use polish shades you already own. They’re also easy to touch up if needed. For busy mornings or spontaneous plans, having a few go-to quick nail ideas can save time while keeping your hands looking polished and intentional.
From minimalist dots to glitter fades and modern French tips, this guide covers 10 quick nail art ideas that are easy to recreate at home. Each idea includes a clear explanation, step-by-step instructions, and a materials list so you can confidently try them yourself.
If you’ve been searching for easy nail designs for beginners, simple last-minute nail art, or quick manicure ideas that still look trendy, these ideas are perfect to save and try.
Let’s explore 10 quick nail art ideas you can create in no time.
1. Single Dot Accent Nails
Introduction
A single dot accent is one of the fastest nail designs you can create. It’s minimal, modern, and works with any base color. The dot can be placed near the cuticle, in the center, or close to the tip for subtle detail. Because it requires only one small design element, this look is ideal for beginners or anyone short on time.
The contrast between a neutral base and a bold dot color creates visual interest without overwhelming the manicure. You can also match the dot color to your outfit for a cohesive look.
What This Design Is
A simple base manicure with one small dot accent on each nail or just one accent nail.
Step-by-Step How-To
- Shape and clean nails.
- Apply base coat.
- Apply two thin coats of your chosen base color.
- Dip a dotting tool or toothpick into contrasting polish.
- Gently press a small dot onto nail.
- Let dry completely.
- Seal with top coat.
Materials Needed
- Base color polish
- Accent color polish
- Dotting tool or toothpick
- Base coat
- Top coat

2. Quick Glitter Fade
Introduction
A glitter fade instantly upgrades plain polish in minutes. Instead of covering the entire nail, you concentrate glitter at the tip or cuticle and blend slightly upward. This creates a soft gradient effect that looks intentional and stylish.
It’s perfect for parties, holidays, or anytime you want sparkle without complexity.
What This Design Is
Solid base color with glitter concentrated at one end of the nail.
Step-by-Step How-To
- Apply base coat and solid color polish.
- Let dry slightly.
- Dab glitter polish onto tips or cuticle area.
- Lightly drag brush upward to blend.
- Let dry.
- Apply top coat.
Materials Needed
- Solid color polish
- Glitter polish
- Base coat
- Top coat

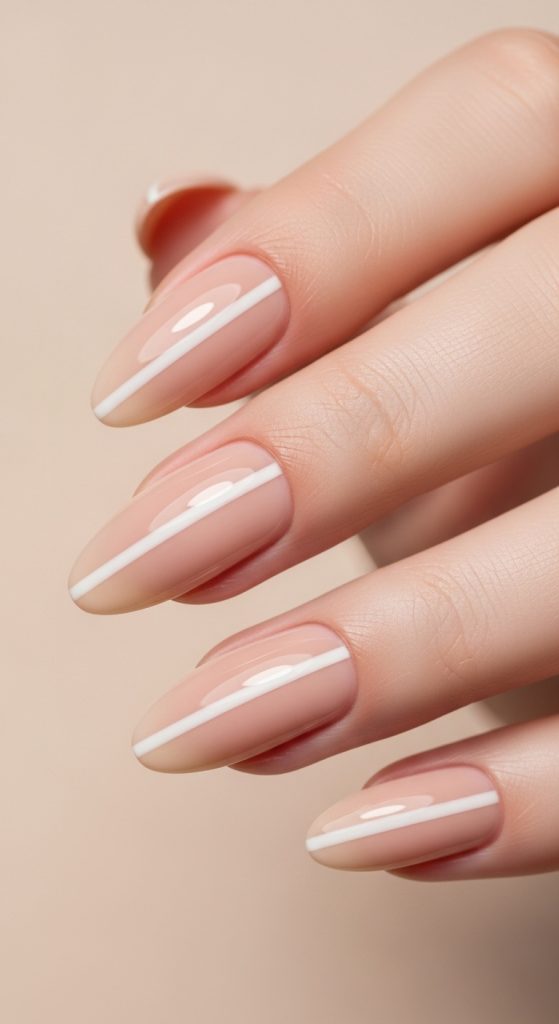
3. Minimal Stripe Design
Introduction
Thin stripe designs look modern and chic while taking very little time. A single vertical or horizontal line over a nude base adds elegance without requiring detailed artwork.
This design pairs especially well with neutral shades like beige, blush, or soft gray.
What This Design Is
A neutral base with one thin contrasting stripe.
Step-by-Step How-To
- Apply base coat and nude polish.
- Let dry fully.
- Use striping tape or thin brush with contrasting color.
- Draw one clean line.
- Let dry.
- Apply top coat.
Materials Needed
- Nude polish
- Stripe color polish
- Thin brush or striping tape
- Top coat
4. Modern Color French Tips
Introduction
Classic French tips are timeless, but swapping white for a bold or pastel shade creates a fresh update in minutes. This quick design looks polished yet trendy.
What This Design Is
Neutral base with colored tips.
Step-by-Step How-To
- Apply sheer nude base.
- Let dry.
- Paint thin colored tip using steady hand or tape.
- Allow to dry.
- Seal with top coat.
Materials Needed
- Sheer nude polish
- Colored polish
- Nail tape (optional)
- Top coat

5. Tiny Heart Accent
Introduction
A small heart on one nail adds charm and takes only seconds to create. It’s perfect for romantic or cute styles.
What This Design Is
Simple base with one tiny heart detail.
Step-by-Step How-To
- Apply base color.
- Create two small dots next to each other.
- Drag downward slightly to form heart.
- Let dry.
- Seal with top coat.
Materials Needed
- Base polish
- Accent polish
- Dotting tool
- Top coat

6. Matte Top Coat Transformation
Introduction
Turning a glossy manicure into matte instantly changes the entire look without adding art. It’s one of the fastest style upgrades.
What This Design Is
Any solid color finished with matte top coat.
Step-by-Step How-To
- Apply base color.
- Let dry.
- Apply matte top coat evenly.
- Allow to set fully.
Materials Needed
- Colored polish
- Matte top coat

7. Two-Tone Accent Nail
Introduction
Painting one nail a different but coordinating color adds dimension quickly and effortlessly.
What This Design Is
Four nails one color, one nail a different shade.
Step-by-Step How-To
- Apply base coat.
- Paint four nails in main color.
- Paint accent nail different shade.
- Let dry.
- Apply top coat.
Materials Needed
- Two coordinating polish shades
- Base coat
- Top coat

8. Quick Ombre Sponge Blend
Introduction
A fast sponge blend creates a soft ombre effect with minimal effort.
What This Design Is
Two blended colors creating gradient.
Step-by-Step How-To
- Apply lighter base shade.
- Add darker shade onto sponge.
- Dab gently onto tips.
- Blend lightly.
- Apply top coat.
Materials Needed
- Two polish shades
- Makeup sponge
- Top coat

9. Tiny Star Stickers
Introduction
Using stickers is one of the fastest ways to achieve nail art without painting.
What This Design Is
Neutral base with small decorative stickers.
Step-by-Step How-To
- Apply base polish.
- Let dry.
- Place sticker with tweezers.
- Press flat.
- Seal with top coat.
Materials Needed
- Base polish
- Nail stickers
- Tweezers
- Top coat

10. Diagonal Color Block
Introduction
A diagonal color block design is quick and modern, especially when using tape for clean lines.
What This Design Is
Two colors separated diagonally.
Step-by-Step How-To
- Apply first color.
- Let dry fully.
- Place tape diagonally.
- Paint second color.
- Remove tape carefully.
- Apply top coat.
Materials Needed
- Two polish colors
- Nail tape
- Base and top coat
